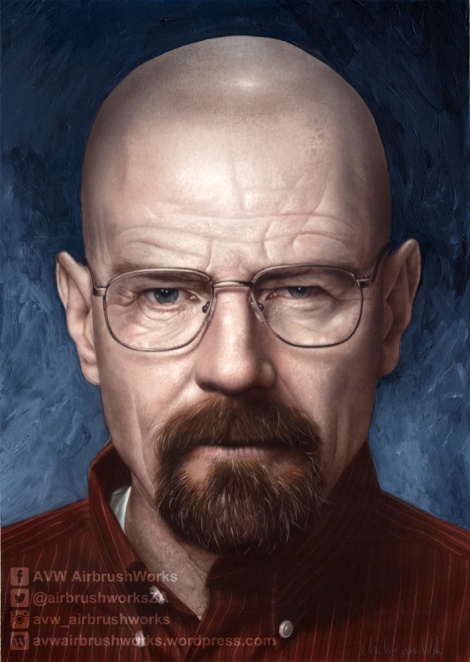
Print to size the image you want to use.

Use graphite paper, not carbon paper, to transfer your image to the surface.

Put as much detail in as you can. You can always erase later if you don’t want it. This is what you will end up with

Make cuts all around your subject where you need sharp edges. Also cut out all the darkest bits for mapping purposes.

I did the background in with a paintbrush and acrylic paints. In this case Payne’s grey, cobalt blue and white. I just like the look of this.

Here you can see all the lines that I transfered, cut and also where I applied liquid mask to keep my highlight clean till the end.

I start with an opaque burnt umber.You can spray in the really dark bits fot full coverage.

Continue filling in with burnt umber. The original shield is still stuck in place so that I can drop it down and do a quick spray.

I use torn paper for wrinkles. Don’t spray on the painting but rather on the edge of the shield. If you need lighter then you can spray further from the edge and let the overspray do the work. The skin freckles were done with the Gerald Mendez FX stencils.

For the uneven skin I sprayed though a kitchen scourer (or a Scotchbrite pad) that I halved in thickness. This needs a bit more air power so be carefull not to overdo it.

I also sand away the paint with a used kitchen scourer

For brighter highlights use an eraser pencil or electric eraser.
Turn your painting for a more comfortable angle. Do the same with the reference so that you can see exactly what to match.

For the white lines in the shirt, I started cleaning them up from the first layer of paint. The dark lines I drew in with a black watercolour pencil.

The beard was done with many dagger strokes. You can also make a hair/fur stencil out of some old broom bristles.


I cut up another reference to do the flip technique. You do one hair, flip down to see if it is right and do see where’e the next hair.

A lot of scratching and repainting was done.

Cut a slit in a piece of paper, keep it open and in place and spray in the stray hair. If you can not dot this with one hand, you can use frisket or tape and stick it down.

You can also use a shield to protect when you erase.

After the burnt umber, I came in with grey in the very dark bits like the pupil and very dark shadows. Red ocher for the warm bits, pinks of the eyes and lips and the shirt were added.

The colour of the eyes were put in by mixing something close. It is transparent so that you get the texture you’re created earlier. The pupils were done with black. Highlights were cleaned up again because I removed the liquid mask earlier.

To do the lips, white, red and grey were mixed to give a dull light pink. This is the mid tone. The shadows is still the layers of burnt umber and red ocher from earlier. If you go over the shadow then just do them again with reduced burned umber and red ocher mix. That is how much I mixed and most of it was tossed at the end.


To do the stubble on his head, I took a piece of paper and a pin and just poked the living daylights out of it. Some closer and other further apart. You can jab hard and soft to get different size holes. When you are done with the poking, take some sand paper and sand the back of the paper. This will get rid of the tiny pieces of paper edges caused by the poking.

You will end up with something like this.

Using burnt umber, I put all the stubble in. I should have done this in the first umber stage. Then I would have done them much darker so that all subsequent layers with soften them. So now I had to do them much lighter.

I now came over all the mid tones with a transparent flesh. Keeping the highlights and not going too deep into the shadows.

Then I went over the white undershirt with a light blue wash and the shirt with a mixture of red and red ocher.

I then realised that I went too dark on the lip next to his soul patch. SO I erased it down to the board and did all the steps from the start. I will now fill the beard up again.


I did some more stubble on the head.

I used a very transparent blue to go around the top of the head and on the cheeks. It was just to pick up some of the reflecting colour from the background. I also redid the background so that I could make his head a bit rounder.

Then you just try and see where you can tweak a bit. Don’t overdo it.
And you are done.
- Please note that ALL images and instructions are property of AVW Airbrushworks and my not be published or distributed in or on any platform without permission from AVW Airbrushworks.

